
1.Frequently Asked Questions
Contact Us
If you need assistance please use a chat icon on the Pricing page, we provide support 7 days a week and typically respond within a few minutes 8am-8pm EST.
About Pricing
All accounts start on the free Startup plan (no credit card required). You can send unlimited emails on Business Basic plan and pricing is based on number of contacts (unique email addresses) in your list, with increments of 5000 on Business plan and 10000 or 25000 on Agency plans.
We have 2 plan options:
1. Send via Amazon SES account and pay $5 for every 5000 contacts (subscribers) on your list in BigMailer (for asset management and analytics) plus $0.1 per 1000 emails sent through SES. Paid plan starts at $20/month for up to 20000 contacts. Amazon SES offers a free tier of 3000 emails per month (first 12 months), after that the cost is $0.1 per 1000 emails sent.
2. Send with BigMailer. Sender domain verification is required. The cost is $10 for every 5000 contacts (subscribers) with x10 email sending credits included per month. Starting at $40/month. We have to review and approve your account based on your sender domain review, so please reach out via chat if you want to get your account approved to send without SES.
If you have more than 1 million contacts please reach out to us via live chat on the pricing page for a custom price quote or schedule a demo.
Can I use BigMailer without connecting to Amazon SES?
We don’t require connecting to SES on Pro and Premium plans. You only need to connect to your own Amazon SES account only on the free and Basic plans. If you would like to upgrade to our Pro plan please reach out to us via chat and let us know what your sender domains are so we can review your website. If approved, you would need to verify your sender domain via DNS records (not just sender email address). If you don’t have access to your website DNS records you can still use BigMailer with Amazon SES connecting, by verifying sender email address with Amazon SES.
Can I send any email content via BigMailer?
You can only send marketing, automations, and transactional emails to subscribers you have permission to send emails to. Cold outreach emails and any kind of unsolicited emails are not allowed. Please review acceptable use section in our terms of service.
Do you provide SES accounts or can you connect to Amazon for me?
You have to connect to your own AWS account. If you don’t have AWS account, you would need to create a new AWS account here. To connect to BigMailer your AWS account has to be in verified status, which is done either via phone or credit card. You can check your AWS account status on this page.
If you need assistance with connection step we would need a login to your verified AWS account.
Delivery and Inbox Placement
BigMailer offers great delivery rates, but it is not the same as inbox placement (email in Spam folder is considered delivered). If you are using Amazon SES without dedicated IPs, the quality of the shared IP pool is lower than some market leaders like MailChimp, CampaignMonitor, and other more expensive providers. You can significantly improve inbox placement by using a dedicated IP which cost $25/month, read more about dedicated IP addresses.
For inbox placement tips please see our Email Deliverability and Inbox Placement Guide to Best Practices
What are Brands?
A brand is a business or a website with its own lists and unsubscribe page. So in cases of franchises or multiple locations, each owner or location would become its own brand. The lists can not be shared across brands and billing is based on unique contacts under each brand. A user can be assigned access to multiple brands. Read more about managing brands on BigMailer.
Do I need to add a credit card to get on a Startup (free) plan?
No. As long as you don’t go over the limit of 1,000 contacts you don’t need to add a payment method.
When will I be charged?
You will be charged immediately after selecting your paid plan and adding your payment information, or upgrading to new level, so make sure to set your limit to be just slightly above the number of customers you have to allow for new sign ups.
2.Account Setup - SES, Unsubscribe Page, User Management
This section covers:
- Amazon SES Account Setup (optional)
- Unsubscribe Page
- Account Settings and User Management
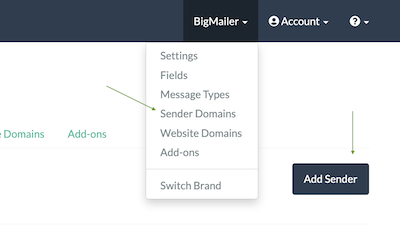
Once you Create a Brand in your account you will see additional navigation in the header for managing brand assets – Lists, Campaigns, and Templates. There are some additional options to manage setup in the menu you can access by clicking on your brand name in the header – fields, message types (aka email preferences), add-ons (adding email suppressions module to campaign UI), and Senders (only shown to customers on Pro plan).
Amazon SES Account Setup (Optional)
If you plan to use Amazon SES you need to connect your AWS account to BigMailer, then follow instructions in BigMailer UI. You may need to get your Amazon SES account out of sandbox mode and request a new daily send limit. Make sure you add and verify a sender identity (the email/domain you plan to send from) before you submit a request to Amazon to speed up approval. Typically, Amazon wants to see that you own a domain and don’t plan to use a free email address like yahoo/gmail for sending emails in bulk.
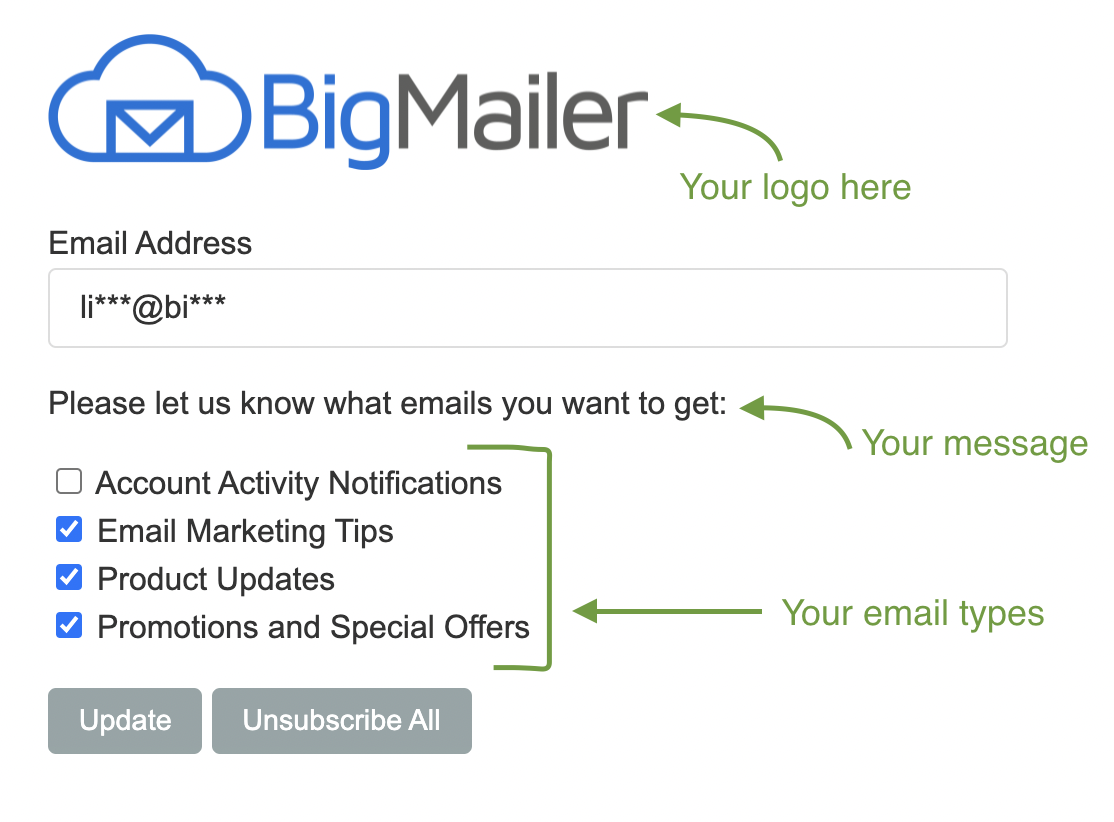
Unsubscribe Page
You can customize your unsubscribe page in several ways:
- Add your brand logo (under Brand Settings page), which will replace the text name of your brand.
- Add message types to allow subscribers select the emails they want to receive based on their preferences.
- Host the unsubscribe page on a custom domain that matches your sender email and tracking links in your emails.
- Customize the text that appears above the message types to match your unique communication style. You can set it on your brand settings page and use a preview button to review any customizations you made.
Have any questions or need assistance with setup? Reach out to us via chat (see bottom right of the screen). We offer support 7 days a week.
Account Settings
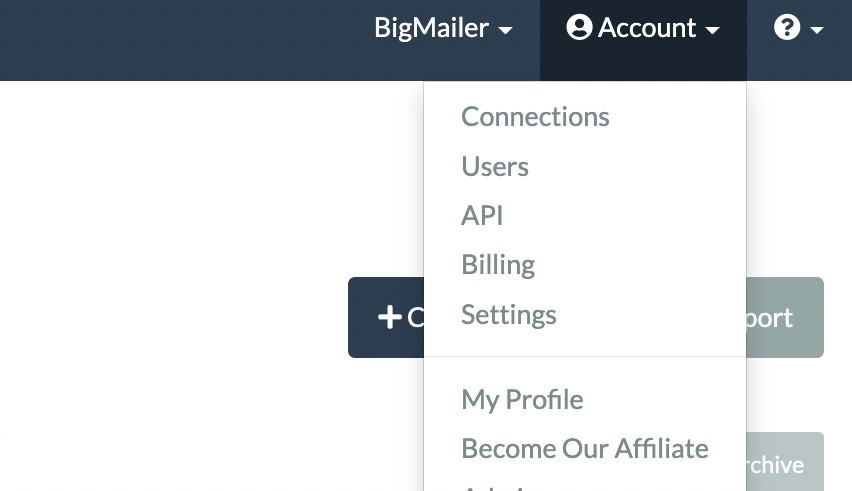 There are several things that can be controlled under Account settings that can be accessed by clicking on “Account” link in the header.
- Account Administrators can invite users under Users page.
- Account Administrators and Account Managers can access API page where they can get they API key and setup web hooks.
- Account Administrators can manage account Billing.
- Any user can enable 2-factor authentication (2FA) on their login by going to Profile page.
- Account Administrators can manage default time zone for the account under Settings page.
Managing Users
When either inviting or editing user permissions there are 4 user roles available:
- Account Administrators have access to everything including user management and billing page.
- Account Managers don’t have access to billing page or user management, but can access SES page and manage SES connections and sender identities. Account managers have access to API page, brand settings and campaigns, but can’t access Lists. This role is best for tech leads or anyone on-boarding new brands.
- Brand Managers have access to brand settings and all brand assets – campaigns, lists, and templates.
- Campaign Managers have access to Templates and Campaigns only, but can not manage or access Lists. This role is best for template designers or someone who manages campaigns.
3.Connecting Your BigMailer Account to Amazon SES
Connecting to Amazon SES is no longer required, see Pro plan option on our pricing page and request access via chat.
You don’t need to connect to Amazon SES if you just want to collect emails via BigMailer web forms on your website.
You can create an SES connection by clicking on the SES link in the menu off the Account link in site header – you will be guided through the steps with screenshots and instructions.
If you get an error during the connection step the most likely reason is your new AWS account isn’t verified via phone or credit card yet. You can check your AWS account status on this page. which will show any required verification steps to complete.
Getting Your SES Account out of Sandbox
To start using your new SES account you need to get it out of sandbox by submitting a request to Amazon and specify daily sending limit you would like. We suggest to include a link to your website, ideally the page where you have an email collection form, into one of the optional fields, and state that you use a platform that automatically processes bounces, complaints and unsubscribes for you.
Amazon typically approves within 1-2 business days. If you have your own domain it would be best to add it as a verified sender identity before submitting a request to Amazon, to ensure fast approval. You can do it either in SES console or in BigMailer under your SES page (Account link in site header > SES). You can add an email as a sender (From address) instead of a domain, but if you do it for an email address with a free service like gmail or yahoo your request to get SES out of sandbox might be denied. Amazon wants to see you have your own domain. If you verify a domain that has no website hosted on it your request may be denied as well.
See Account Setup section for more detailed instructions on verifying senders and other steps.
Connecting Multiple SES Accounts
Customers on paid plans have an option to connect multiple Amazon SES accounts, which is very practical when managing multiple brands. You can assign a different SES account to each brand, or share SES account(s) between many brands. If you would like to use this feature please ask us to turn it on for you via chat.
Amazon SES Pricing
You will be charged additional fee by Amazon for using SES. First 62k emails per month are free, then $0.10 per 1,000 emails. Read more about Amazon SES pricing
4.Verifying a Sender
Verifying a Sender
Skip to troubleshooting section at the end if you already added DNS records.
Verifying a sender identity – email or domain the emails are send from – is a required step for sending emails on most email platforms, not just BigMailer. Without a verification step, anyone could send emails on behalf of anyone.
There are 2 places where the sender verification is managed:
1. If you are on a Pro or Premium plan and sending with BigMailer (not Amazon SES)
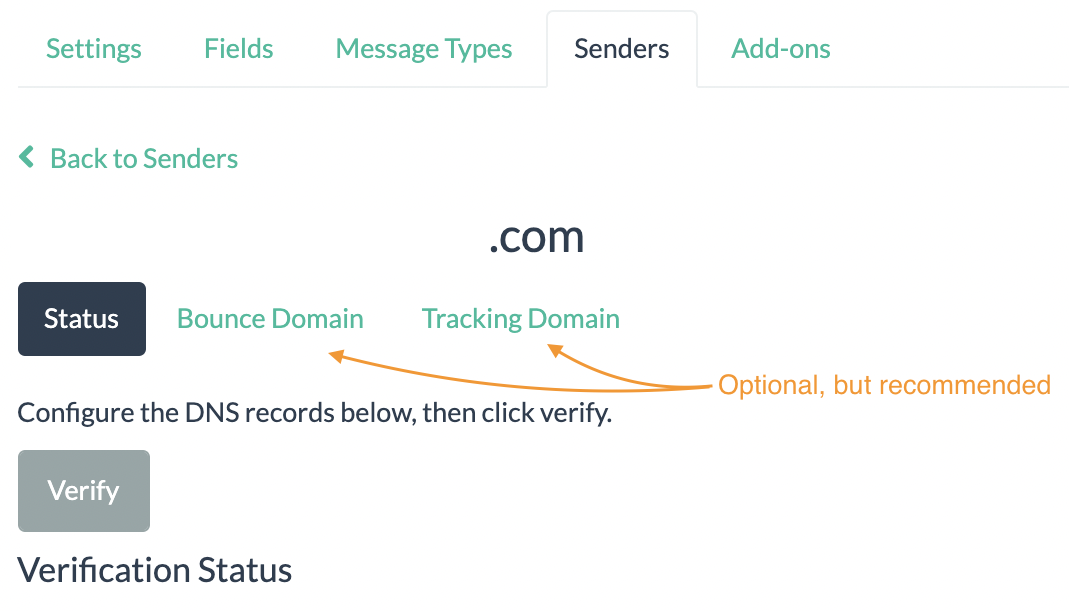
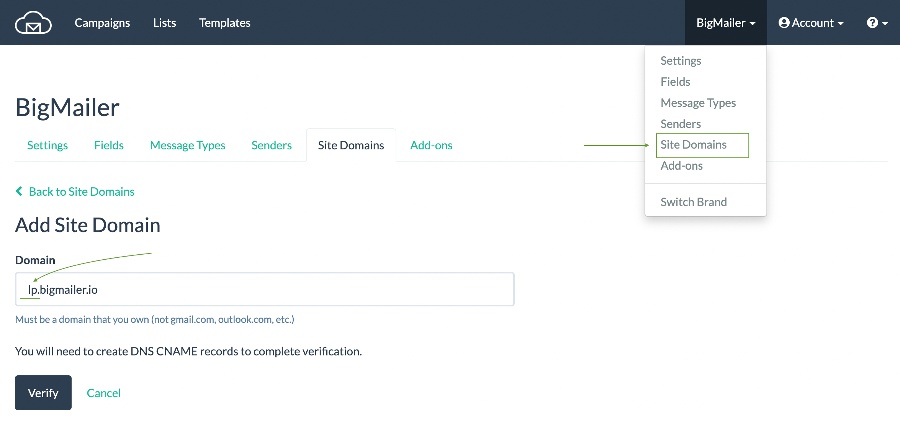
Click on your brand name in the header to open the menu, and select “Sender Domains”, then click on “Add Sender” button on the page.
You will need to add a TXT type DNS record to verify a sender domain. Adding CNAME type DNS records for custom bounce and tracking domains is optional, but highly recommended for better delivery and inbox placement due to more authentic looking email and email headers.
2. If you are using Amazon SES to send emails
You can manage your senders under SES from the menu under Account link in the header. When using SES the senders are stored under each SES connection since multiple brands can use the same SES connection. You have to be an Administrator or Account Manager to access SES connections page and manage sender verification records.
Adding DKIM and SPF Records
While wasn’t required required prior to February 2024, it is now required by Google and Yahoo to have DKIM record for senders who send more than 5000 emails per day. Please see our help pages on DKIM and SPF for detailed instructions.
Custom Tracking Domain
Adding custom tracking domain to replace a generic tracking link used by BigMailer for your links can improve inbox placement. It involves adding a DNS record for the sub-domain on your domain and takes 3-5 min to add and 1-3 hr to auto-verify. For example, email.your-sender-domain.com or clk.your-sender-domain.com. This option doesn’t cost extra most of our customers setup custom tracking domains.
To add a custom tracking domain, go to your senders page and click on the domain name you want to add custom tracking to. Click on the “Tracking” tab, then add the sub-domain you want to use for custom tracking (clk. or em.) and submit the form. You will see instructions for adding DNS records to your domain. Make sure the sub-domain you choose isn’t already in use for something else or you can break existing service (e.g. email plugin on your WordPress site may already use email sub-domain).
Troubleshooting Your DNS Records
You can check your DNS entries via this tool to confirm they were added correctly. Sometimes DNS records are added in a wrong place and this tool can also tell you who is the DNS provider for your domain. See example of how you would check for TXT record:

If you added your sender domain and confirm using the tool above but it’s not verified in BigMailer UI, we may need to manually re-trigger a check so reach out to us via chat. The automated checks stop 72 hours after a sender record is added, so if you waited more than 3 days to add DNS records you need us to re-trigger a verification manually on our end.
Where And How to Add DNS Records
Log in to your domain’s DNS or web hosting provider, and then add the new CNAME records containing the values BigMailer provided. Different providers have different procedures for updating DNS records. The following table lists links to the documentation for several common providers. This list isn’t exhaustive, and inclusion in this list isn’t an endorsement or recommendation of any company’s products or services.
DNS/Hosting providerDocumentation links:
- GoDaddy – Add a TXT record
- DreamHost – How do I add custom DNS records?
- Cloudflare – Managing DNS records in Cloudflare
- HostGator – Manage DNS Records with HostGator/eNom
- Namecheap – How do I add TXT/SPF/DKIM/DMARC records for my domain?
- Names.co.uk – Changing your domains DNS Settings
- Wix – Adding or Updating CNAME Records in Your Wix Account
If you’re not sure who your DNS provider is you can use MX Toolbox to check, see Troubleshooting section above.
5.Plans, Pricing, and Billing
About Pricing
All accounts start on a (free) Startup plan, which doesn’t require adding a credit card. Pricing on all paid plans is based on number of contacts (email addresses) stored on BigMailer platform. Sending limits varying between plans. When you select a paid plan you will be asked to add a credit card to your account and will be charged immediately, based on the level of contacts you selected.
We have 2 plan options:
1. Send via Amazon SES account and pay $5 for every 5000 contacts (subscribers) on your list in BigMailer (for asset management and analytics) plus $0.1 per 1000 emails sent through SES. Paid plan starts at $20/month for up to 20000 contacts. Amazon SES offers a free tier of 3000 emails per month (first 12 months), after that the cost is $0.1 per 1000 emails sent.
2. Send with BigMailer. Sender domain verification is required. The cost is $10 for every 5000 contacts (subscribers) with x10 email sending credits included per month. Starting at $40/month. We have to review and approve your account based on your sender domain review, so please reach out via chat if you want to get your account approved to send without SES.
Pricing examples:
<1000 contacts – $0. BigMailer logo in emails, Amazon SES connection required.
< 20000 contacts on Business Basic – $20/month with unlimited emails, Amazon SES connection is required. See more pricing examples.
<20000 contacts on Business Pro- $40/month with 200000 emails included per month. Overage at $0.4 per 1000 emails sent, no hard limit.
We offer volume discounts for infrequent sending with lists over 300000. Please reach out to us via chat for a custom price quote.
Going Over The Limit
If you go over your selected limit in a given day via manual import your ability to send emails will be paused that day until a new limit is selected on the Billing page. If you go over limit via email collection forms we automatically update your account to the next billing tier and may charge your a pro-rated amount for the remainder of the billing cycle.
When you downgrade, a pro-rated credit (for the rest of the billing cycle) will be applied to your account balance.
Pro-rated billing works up to the minute, so you may see very small incremental charges when you upgrade or downgrade.
Agency and Enterprise Plans Pricing
BigMailer is an email marketing platform optimized for agencies with unlimited brands, user/client accounts, and template sharing, and high volume senders. Please schedule a demo to discuss your volume and needs to get a custom price quote. Your rate will be based on a total of unique contacts stored under each brand and number of emails sent per month on average across brands. Lists can’t be shared between brands but if you are a company with multiple products and need to use the same list we can apply a custom discount based on intended usage. Agencies have an option to pre-pay on an annual basis for an additional 15% discount.
6.Lists and Contacts Management
About BigMailer Lists
BigMailer lists behave like tags (virtual groups of emails) and don’t allow for storing duplicate email addresses when a contact is part of multiple lists. It’s typical to use a different list for each source of email collection – one-time imports, website forms, 3rd party integration, API-based actions, etc. You could also setup Lists based on customer journey with you – newsletter signups, members, paying customers, etc, or a combination of both if that helps.
We recommend to create Lists to add your contacts to, including a separate TEST list with your own emails to help future testing. “All Contacts” list is a system-defined parent list and includes all contacts across all your lists. It’s best to not add contacts directly into this parent list to avoid unintended consequences.
Adding Contacts to Lists
There are several ways to add contacts to a list:
- An import of a csv file.
- A web form that sends data to a list it’s assigned to.
- An API call (e.g. to create a contact when someone makes a purchase).
- An integration (when someone performs an action on a 3rd party platform a record of contact is created at BigMailer)
- Manually adding contacts one by one (e.g. for test records).
Keeping your contacts in separate lists would help you see how your difference audiences engage and you can setup Automation campaign triggers against new records added to your lists.
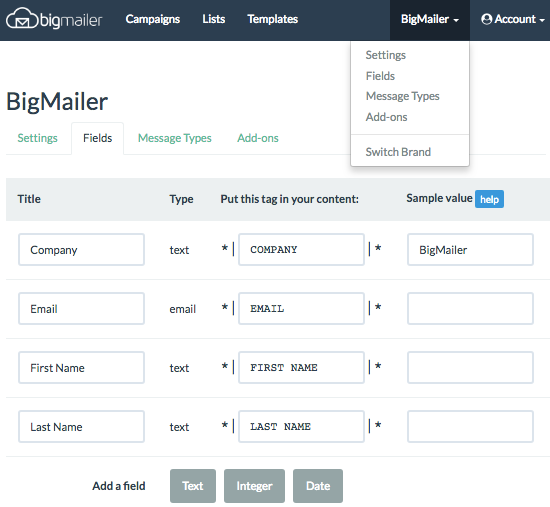
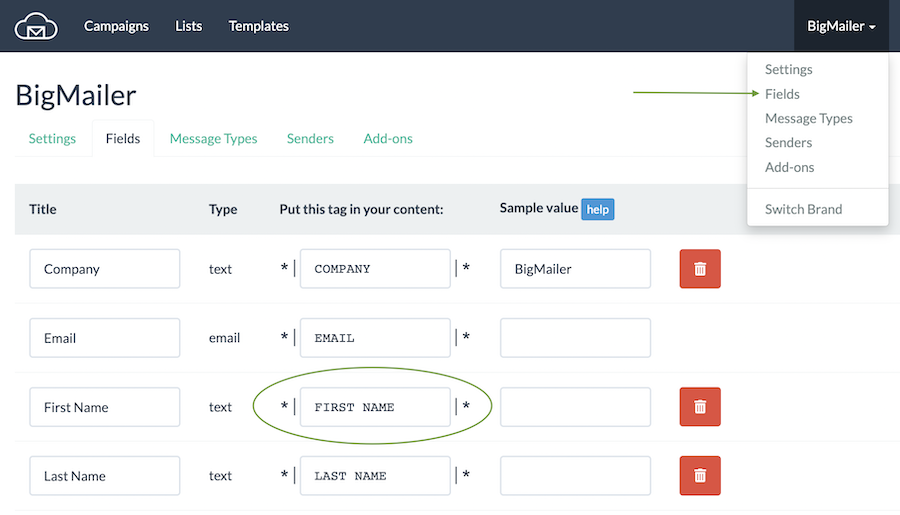
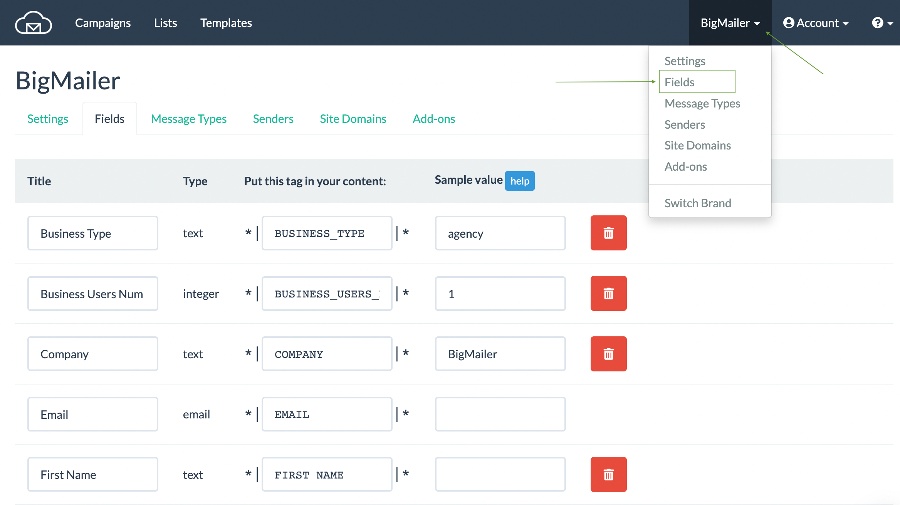
It’s a good idea to define all your fields before adding contacts – click on your brand name in the header and select Fields in the menu. Fields can be created automatically during a manual import or API call, but it can be created with a wrong data type if the data formatting is off and it can change the operators available for segmentation. For example, if your dates are in a wrong format the field can be created during import as text field and operators on segmentation will be “equal to” and “not equal to” instead of “before” and “after”. Or you could end up with multiple columns for the same data point because your import files/sources used different column names.
If you have all fields pre-defined you will have a chance to map your columns to your fields during a CVS import step.
Adding sample values for each field can be very helpful – they are used to replace merge tags in test emails you send to yourself.
Verifying Older Lists
We recommend using our built-in email validation during the import step, if your list hasn’t been used in more than 3 months. In addition to identifying invalid emails BigMailer can identify and remove some typo spam traps, which traditional email verification providers don’t do.
Keep in mind that not all emails can be verified without sending, for example some older yahoo.com and aol.com addresses that are valid but suspended for inactivity can’t be verified and so emails for those providers may result in higher bounce rate on older lists. The accuracy will depend on how old the list is and varies only 1-2% between email validation providers.
Email Collection via Webform
To add an email collection form you need to create a List first, then click on the arrow down button next to List name (on Lists tab) and select “Forms”, see:

Once on a Forms screen, just click on Create a Form button, name your form and hit Save.
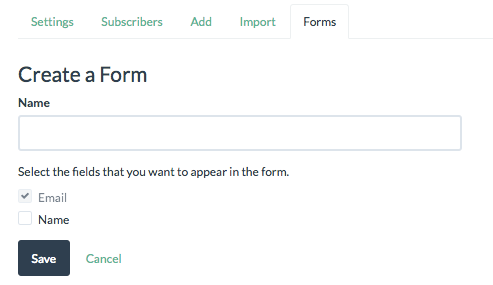
Create an email collection form
You have an option to add reCAPTCHA to your forms as well, if you want to prevent sign ups from bots.
NOTE: By default, only the Email field will be listed, unless additional columns have been defined via an import of data into that list or the additional fields/columns were manually defined. To define fields, click on your brand name in the site header and select “Fields”. Make sure to specify correct data type for each field you create, it will have an impact on the operators that will be available during segmentation.
Once the form is defined you have 2 options for using it:
- Copy the code provided and embed it into your website.
- Link to signup form hosted on BigMailer.

Email Collection from an Application
This section covers uses cases and suggested methods for collecting emails from your applications via APIs.
There are various use cases for when you might need to add an email to your lists based on user actions, besides signing up to receive emails from you, for example – registering as a member, becoming a paid customer, signing up for an event, etc.
The primary way of adding a new contact after an event on your website is to specify a List to add a contact to when they are sent a specific Transactional email as part of campaign settings.
If you don’t want to send a transactional email and just want to create or update a contact record on BigMailer you have a couple options.
- Making a real-time API call for each transaction.
- Making a back-end API call on a recurring schedule in batches (hourly, daily). This may be preferred for high volume of calls and if real-time data availability isn’t of importance.
The batch update option allows you to send some additional data points from your application, besides email addresses, that can be very useful but may not be readily available when making a real-time call.
Send Events to Your Application via Webhook
You can configure a webhook to send events (bounces, complaints, and unsubscribes) to on your API page. See this article for best practices and code samples.
Exporting a List or List Segment
To export a list go to Lists tab in the header and click arrow down icon on the gray button next to list, then select “Export”. Follow instructions on the next screen to download your .csv file. By default, an export will contain all data we have, including your custom fields and negative engagement (bounces, complaints, unsubscribes), but you can choose to only download some columns or email-only. BigMailer automatically processes bounces, unsubscribes and complaints, so future emails are not send to those contacts. You only need to export this data for use outside BigMailer platform or if you want to bulk delete your hard bounces and complainers.
To export a segment of the list go to Lists tab in the header and click arrow down icon on the gray button next to list, then select “Export”. On the next screen check the box to only export a segment and specify rules to build the desired segment you want to export.
Deleting Lists or Contacts
There are a few ways to delete contacts on BigMailer:
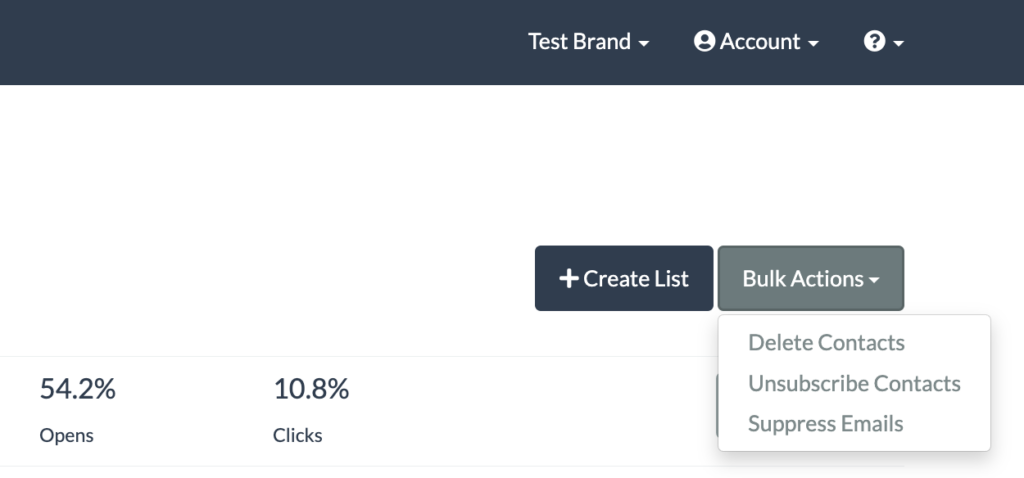
1. If you want to upload a file of users to delete across all your lists you can use “Delete Contacts” button on the Lists main page, see screenshot:
You would use this option if you want to delete a specific segment of your subscribers, which you would need to export first.
If you wanted to delete contacts from a specific List only, but keep them in other lists you would need to export your segment, then add a column with any name and value NO, then re-import them into All Contacts and map the new column to the list that you want subscribers removed from.
2. You can also choose an entire List to delete. Go to Lists tab in the header and click arrow down icon on the gray button next to list:

Then click the checkbox to delete contacts from the List.

Any contacts in the selected list will be removed from all your Lists. Any contacts that have been sent an email in the last 21 days will not be removed, because once a contact is removed, the unsubscribe page stops working for that contact. This may result in the recipient clicking on Complaint/Spam button instead, which may negatively affect sender reputation.
3. You can manually delete contacts 1 by 1 on contacts view – just click on the Lists name and use paging or Search to locate the contact you want to delete. We don’t recommend using this option except for your own test records because ALL data and activity history is deleted with this option so no reference of the contact and your action remains.
Deleting a List Segment
If you want to delete a segment, you need to export the segment as a CSV file, then use the option to delete contacts using a CSV file described above.
To stop sending to unengaged contacts before the 21 days limitation expires you can simply exclude them from your Bulk campaigns using the segmentation rules.
For detailed examples of the scenarios mentioned above please refer to this article.
Manage Segments
Segments can be used to define a target audience for a campaign or for exporting.
To define a new segment go to the List you want to create a segment for (it can be All Contacts), then click on Search button and define your rules. After you click on “Show Results” review the audience size in the top right corner to confirm you created it correctly and then use “Save as Segment” to save it for future use.

You can also Edit your segment rules either before you save it or anytime after. The segments are dynamic – they are just a saved set of rules and not a fixed audience.
Here is an example of a segment for recently active or added subscribers:

7.Campaign Management
Campaign Dashboard
You can filter campaigns by type and status using the checkboxes in the navigation column. You can copy any campaign to create a new one and rename any campaign, regardless of status.
Deleting Older and Test Campaigns
You can only delete campaigns in Draft mode – just click on arrow down icon and select Delete from the menu. Once a bulk campaign is complete or an automation/transactional campaign is activated you can only archive them. On the main Campaigns list select a checkbox next to a campaign then click on “Archive” button on top right of the table. You can see your archived campaigns under the label in the left navigation column.

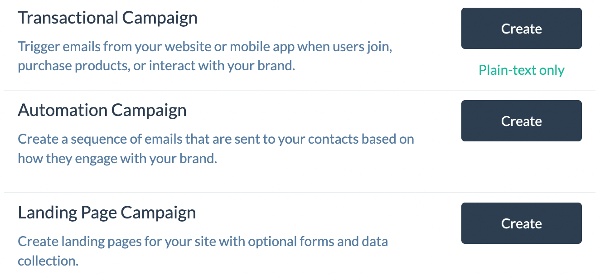
8.Bulk/Marketing Campaign (with AB testing)
Marketing emails are also often referred to as promotional, bulk, broadcast, newsletter, or email blast. You can start a new campaign by clicking Create button on the Campaigns main dashboard and then selecting a campaign type or just use a “Copy” option on an older campaign, which will create a new copy with all fields and content copied over.
Your entire workflow for creating a bulk/newsletter campaign lives on one screen.
Adding an Unsubscribe Link
BigMailer platform requires and enforces the presence of an unsubscribe link on all Bulk/Marketing campaigns.
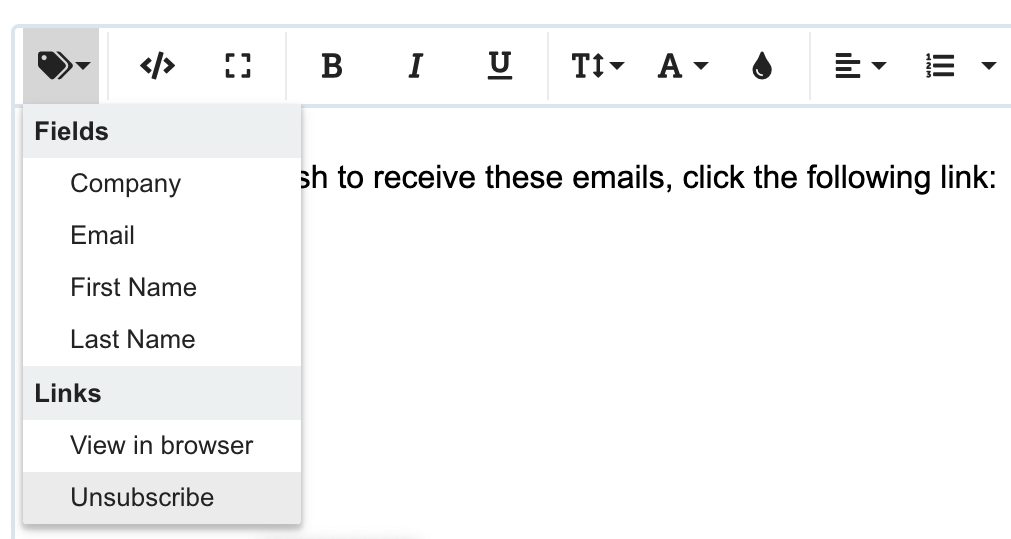
Here is how to add Unsubscribe link into your email template:
In Drag-n-Drop Editor (while on Text element):

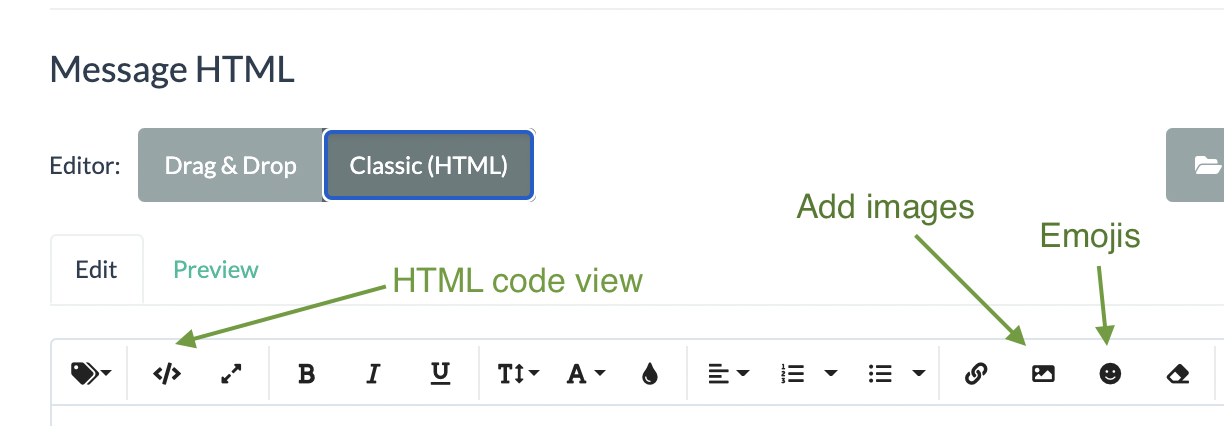
In Classic Editor:
To lower a complaint rate and improve email deliverability and inbox placement it may be beneficial to use the word “Unsubscribe” or “Opt-out” instead other alternatives like “Manage Preferences” or other less explicit instruction. Mailbox providers scan the email body for the presence of the unsubscribe link so it is best to make it easier to locate. Avoid using “click here” phrase as unsubscribe link, it’s considered a spam phrase and can increase your spam score.
If you have many different email collection sources you can use extra text around your unsubscribe link similar to “You have received this email because [reason or method of getting on the list]. If you no longer want to receive these emails please Unsubscribe“. This type of text can help subscribers recall how they may have gotten on your list, for example created an account on your site.
Tracking Options
By default, BigMailer automatically tracks opens and clicks on all campaigns. You have an option to turn off click tracking if you don’t want to use our tracking link in your email. You also have an option to use a custom tracking domain (free self-service option available on all plans) that matches your sender email, which can greatly improve your email deliverability.
You also have an option to include additional parameters to your links, for example utm_ parameters for Google Analytics. Read our guide to email campaign tracking to explore this option further.
Google Analytics utm parameters tracking
Template Management
You have the option to use your existing templates by copying HTML code into a Classic editor. With our Drag-and-Drop editor you can create advanced layouts and all templates are automatically mobile optimized. You also have an access to a library of stock images which you can use at no extra cost.
 Including text version on every campaign is highly recommended as it helps with inbox placement. Some spam filters, like SpamAssassin, add points to spam score when text version is missing. You can generate the text version from the HTML version, just review the formatting and make sure that your unsubscribe link is still formatted properly and didn’t get merged with any other elements.
Sending a Test Email
You can send a test email to yourself without scheduling a campaign by listing the email addresses in the field provided on Create/Edit Campaign screen. 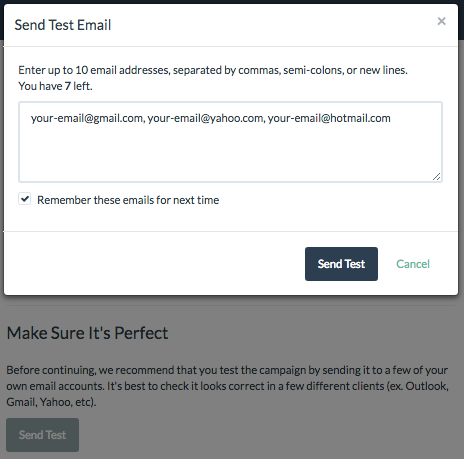
If you don’t get your test email or it goes to Spam/Junk folder, there can be several reasons for it. Follow this list below to troubleshoot:
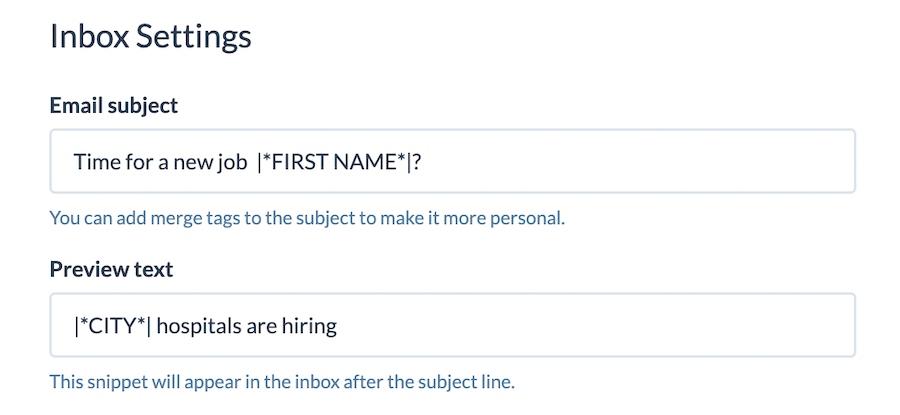
- If you used merge tags (aka variables) in your email but haven’t specified default values for them in your settings the email sent will have placeholder text where the variable values should appear, e.g. *|NAME|*. This will cause the mailbox provider to identify email as spam and either block the email completely or place it into Spam/Junk folder. To address this, go to Fields under your brand and add sample values to the fields you have defined (see screenshot).
- Your sender domain configuration isn’t complete. Please see “Account Setup” section for more info.
- You are missing the unsubscribe link in your email template, see section above.
- Your subject line or email body contains words that increase your email spam score. Please refer to this list of common Spam words. It’s best to keep subject line short (3-4 words) and continue it in the preview field.
Volume Throttling
If you send more than 50000 emails per day then volume throttling may be of benefit, especially if you are a new sender and don’t have a history of sending more than 10000 emails per day. If you would like to try this feature please reach out to us via chat and request the feature to be turned on on our account.

Once enabled, you can see the module above scheduling. We suggest to limit your sending to 3-6k per 15 min, for a list 50000-100000, and 20000 for a list over over 100k, for best deliverability and inbox placement and start around 6:30am (local time) on week days.
Scheduling or Sending Immediately.
To schedule your marketing (aka bulk) campaign you need to finalize all other fields first (campaign name, subject line) then scroll down to the bottom of the campaign screen. You will see an option to proceed with scheduling.

Once you click on the checkbox you will see an option to send the campaign immediately or to schedule it to be sent in the future.
Paused Campaign Due to High Bounce Rate
BigMailer platform pauses a campaign that reaches a bounce rate of 8% (platform default) to prevent your Amazon SES account from suspension. You can change the platform setting to be higher or lower in the range of 1-15% for each brand, just click on “Settings” button on the brand list page and expand “Advanced Options” section.
All email lists decay overtime – the older the list the higher the % of invalid email addresses.
A typical list decays at 2-3% per month, and B2B lists tend to decay at higher rate due to work email changes.
If your email list hasn’t been engaged in 2+ months it’s highly recommended to validate your list before uploading into BigMailer to reduce your bounce rate (should be below 5%), improve email deliverability and inbox placement. We have partnered with Bouncer (EU-based) and Emailable (faster verification for larger lists) to get our customers additional discounts.
Soft bounce rate doesn’t negatively affect your Sender reputation but BigMailer includes it in the count against the threshold to give you an opportunity to review and filter our high bouncing domains to avoid paying for sending to those domains in case a provider is temporarily down (happens with small telecom companies).
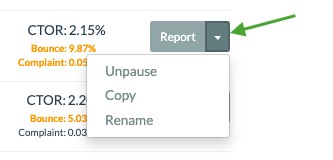
When your campaign is Paused you have 2 options:
- Just Unpause to continue sending – may be practical if your campaign just started sending and the bounce rate is only slightly above the threshold. As more emails go out the bounce rate can fluctuate and go up/down.
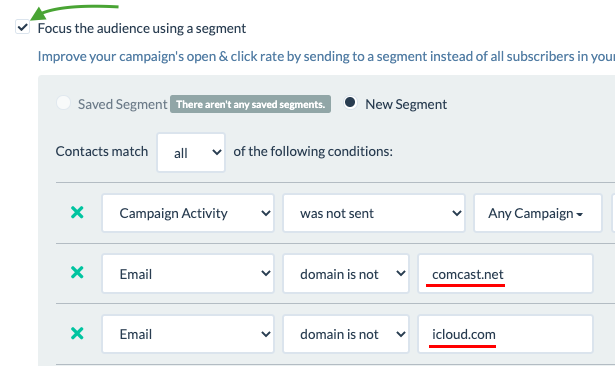
- Review your campaign engagement by domain report. If you see an opportunity to filter out high bouncing domains just copy the paused campaign and add segments on the new campaign to suppress high bouncing domains.
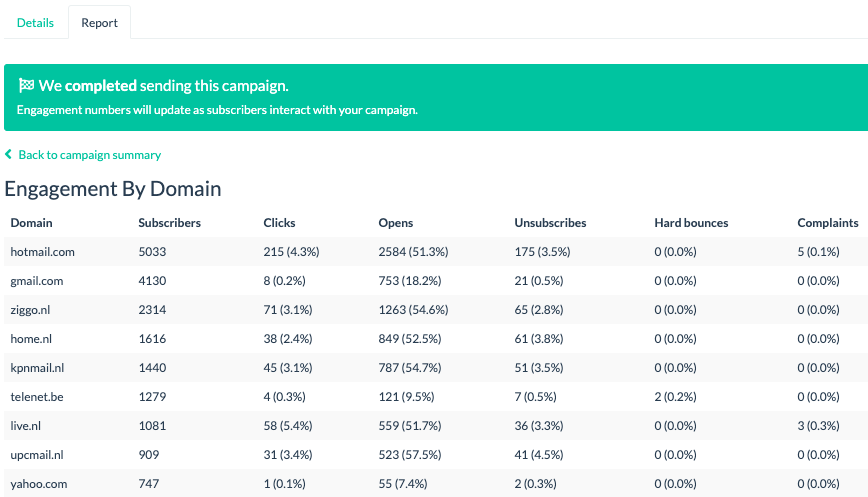
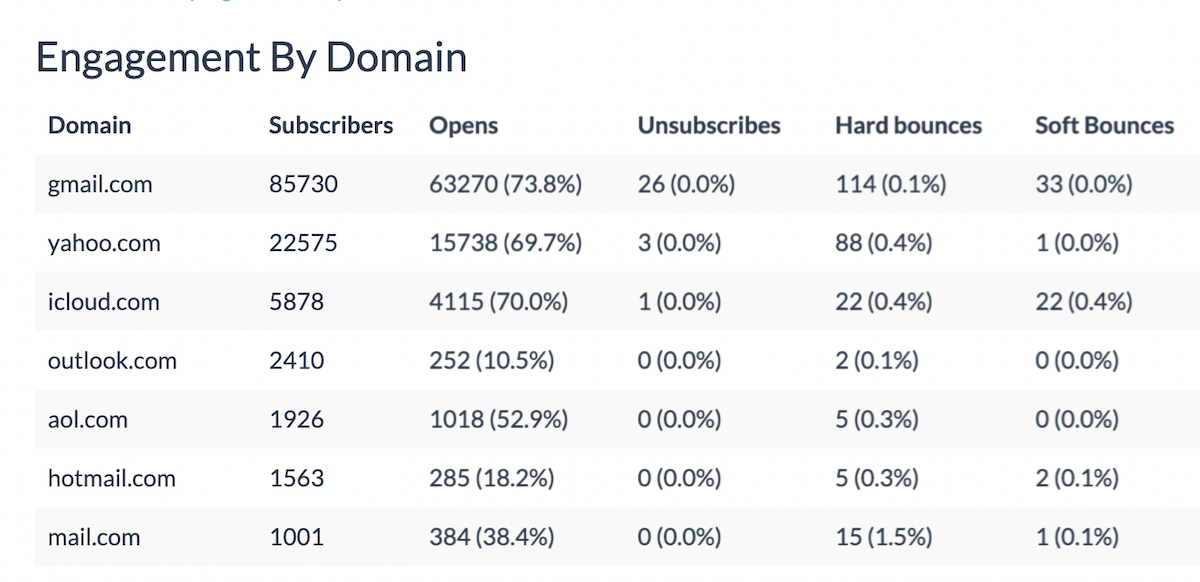
You can see which domains (mailbox providers) hard or soft bounce at high rate on your engagement by domain report.
Here is an example of what the campaign engagement by domain report looks like.
Setting Up an AB Test
Create your bulk/marketing campaign the same way you usually do, for example by copying and modifying your older campaign.
TIP: You would need a good list size of high engagement to get statistically significant results.
Determine how many variations do you want to test and click on the A/B Test button next to the subject line label:
AB testing is only available on bulk campaigns, not on transactional or automations. You can test up to 3 subject lines on a single campaign.
A winner is selected at least 2 hours (or later) after campaign is sent, to allow for meaningful data collection, so you will only see raw data for the first 2 hours after a campaign is sent.
Newsletter Archives
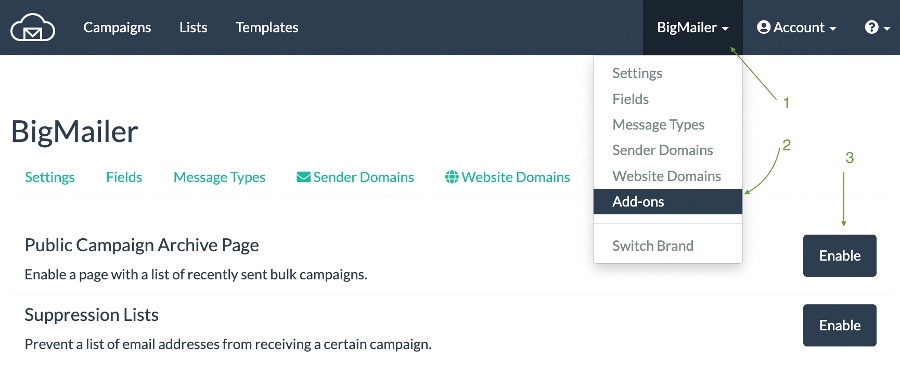
You have the option to enable an archive page, for listing you bulk (only) campaigns that don’t have archived status. Here is how to enable the archive page:
- Go to your Brand name link in the header and expand the menu
- Click on “Add-ons”
- Click on “Enable” button next to “Public Campaign Archive Page”
Once enabled, you will see your archive page link on any campaign report page.
Quick Tips:
1. When you use links to past emails from the archive page they will not contribute to your campaign engagement stats (unlike the one you would grab from View Browser link).
2. Consider linking to the archive page on your email signup module to show your subscribers what they get.
3. To “hide” some campaigns from the archive page, simply archive them from your main dashboard page.
9.Working with Automation or Drip Campaigns
About Automation Campaigns in BigMailer
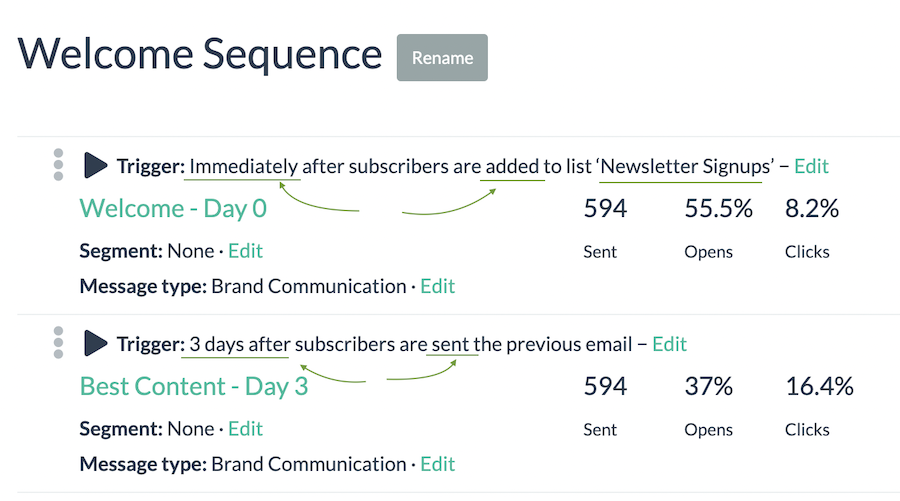
An Automation campaign can consist of 1 or more emails triggered by an event. It can be setup as a simple confirmation for a signup action, often referred to as an auto-responder. A common use case for an auto-responder is a newsletter signup confirmation email.
The most typical trigger for an Automation campaign is a contact being added to a list, which can happen via: manual CSV file import, web form, transactional email, API call, or a 3rd party integration. The simplest way to test an Automation campaign is so add your test email manually using an “Add” tab under a given List.
The emails in a sequence can be triggered with:
- A trigger condition based on engagement, AND
- Optional time delay specified in number of hours, days, or weeks.
Each email in the Automation campaign can be in either HTML or text-only format and each email can be activated or paused at anytime. A sequence can also be re-arranged at anytime – you can drag an email step into a new position in a sequence but no history of changes in the sequence is stored (no revision history).
Email Scheduling Logic
The automation emails are scheduled at the time of the trigger, ignoring any delay rules. So if the trigger for an email step is “after previous email is SENT” then the email is scheduled as soon as the previous email is SENT, regardless of a delay rule. Re-arranging steps for a live sequence, or changing delay rules, will not have any impact on emails already scheduled.
One way to make changes to a live sequence is to copy the step you want to move, then pause original in its place and set live the new step in new place or with new trigger rule. This way you preserve stats for the original rules used.
Using the copy and pause method doesn’t prevent any subscribers from receiving the same email twice, it’s just a way to not mix up stats for states before/after change is made. You can try to exclude subscribers from the new version using campaign engagement on a segment as “didn’t open any campaigns in X days” if there are no other emails being sent to a subscriber (e.g. transactional).
See our article for getting started with Automation Campaign for detailed instructions. Read more about examples of automated emails in our email marketing automation guide.
10.RSS to Email Campaign
You can pull in a single/latest RSS item by dropping merge tags into your template via the menu options in the drag and drop editor. We have a simple template for an RSS campaign in our template library.
To add merge tags into your HTML template code or to loop through multiple RSS items you would need to use merge tags as part of HTML block.
RSS Images and Merge Tags
You can control merge tags syntax in the drag-and-drop editor using the custom HTML element.
You can use RSSITEM:IMAGE or RSSITEM:IMAGE_URL to add an RSS item image into your template. The first will output a full HTML image tag for the item image, the second will just be the url. The first you will want to use with the SAFE / HTML filter so that the content is not escaped, example:
*|END:RSSITEMS|*
If you want to generate the IMG tag yourself and get the URL of the image:
*|END:RSSITEMS|*
*|RSSITEMS:|*
Or just for the latest image URL:
*|RSS:IMAGE_URL|*
Common Issues with RSS to Email Campaigns:
Please review this list of most common issues if you are having troubles setting up your new campaign or your campaign isn’t sending when you expect it to:
1. Published Date
If your campaign isn’t picking up new posts and not sending emails take a look at the published date field in your RSS feed as it might not be in a valid RSS format. The recommended date format is RFC822.
Generate a valid pub date with PHP using the constant DATE_RFC822 constant, like this
echo date(DATE_RFC822)
2. Image is Not Added to Template
RSS feeds may not include a standalone image item you can reference with merge tags and instead may just include the image as part of content body, in which case you will have limited options for formatting the image appearance in your email template.
3. Campaign is Not Going Out
Many websites, and especially those managed with a content management system (CMS) or using caching solutions like Cloudflare, can have security plugins or firewalls that prevent access to your RSS feed. In this case an email marketing platform may not be able to access your feed and publish your updates to an email unless you remove the restrictions, which often can be done just for the feed URL.
11.Managing Templates
Classic (HTML) Editor
How to import HTML into classic editor
To add your HTML template to editor:
- Switch to code view by clicking on the </> icon
- Paste your HTML code
- Clicking on the </> icon to go back to Edit view and save the change.
Drag-n-drop Editor
To create a new page or modify an existing template you need to first drag some row containers (singe or multi-column) into the template area, then drag the content blocks into the row containers.
How to add an image inside the text
To add an image in the middle of the text you need to split the text to be in separate rows and add a row for the image element. So your structure would be like this:
Row > text
Row > image
Row > text
12.Managing Contacts - Unsubscribes, Bounces, Complaints
By default, BigMailer treats a contact as undeliverable after it soft bounces 12 times for accounts that were created after November 2021 and 5 times for older accounts. You control this setting on your Brand settings page and can set it to any value. The most common reason for a soft-bounce is mailbox full, so consider your email frequency when changing this setting. Other reasons for soft bounces are: mailbox provider service down, email rejected, email size too large.
You can configure a webhook to send events (bounces, complaints, and unsubscribes) to your application – get started on your API page. See this article for best practices and code samples.
Hard bounces can be periodically deleted by you to avoid paying for unusable contacts. See List Management section for instructions on exporting and deleting list segments.
All your contacts included in the exports by default, including bounces, complaints, and unsubscribes. To export only some contacts you can use segmentation on the export page to specify which segment(s) you want to include or exclude in your export.
When importing your your exported list back into BigMailer make sure to use “Skip this field” option to not import some of the stats as custom fields, to not clutter your UI with extra field data.
What is a complaint?
A complaint means the email recipient either marked the email as Spam or clicked a Complaint icon (Gmail has it as an icon and not as a text label) – it’s a manual and deliberate action although not completely impossible to happen in error. BigMailer treats a complaint as an unsubscribe and never sends future emails to anyone who complained in the past. A complaint rate should be below 0.1% for good deliverability and to avoid Amazon SES account suspension.
A complaint rate is typically higher for:
- Cold outreach campaigns (these type of emails are against BigMailer terms of service).
- Emails to purchased/renter lists. Buying lists is a bad idea and rarely works out for the sender. This is because email recipients don’t expect emails from the sender and complaint at higher rate, which damages sender reputation in the long term.
- Emails with unsubscribe link hidden, pushed down with space, or hard to locate. It’s best to use a clear text label like “Unsubscribe” or “Opt-out” on the unsubscribe link in the same or larger font size as the main body. This is because mailbox providers scan the email looking for unsubscribe link and it can make a difference for deliverability and inbox placement. The harder it is to unsubscribe, the higher the complaint rate.
13.Improve Email Deliverability and Inbox Placement
To troubleshoot why your email landed in spam folder consider these questions:
- Is your email sender domain DKIM and SPF properly configured?
- Did you setup a custom tracking domain (to match links in the email to sender)?
- Do you need to build your sender reputation for sending high volume?
- Does your email subject line and message body use many spam words?
- Should you consider using a dedicated IP?
- Did you include a text version of the email? You can use auto-generate option below the template editor, just make sure to review it to make sure your unsubscribe link is properly formatted and wasn’t merged with some other footer links or text.
- Did you include an unsubscribe link with a clear text label? Use “unsubscribe” or “opt-out” text label for your unsubscribe link and make sure your text version has it too – mailbox providers scan the email body looking for this link so it’s best to use simple and clear labels.
- Did you send a test email without an unsubscribe link added or with merge tags and don’t have sample values defined? You can add sample values on your Fields page which you can access by clicking on your brand name in the header.
Please refer to our email deliverability – guide to best practices for additional information.
My emails go to Gmail Promotions tab, how do i get into Primary?
Typically, bulk emails sent from marketing platforms (versus 1:1) with the same exact content go to Promotions tab. To get more emails into Inbox you can try these:
-
Avoid using CAPS, excessive punctuations, or common SPAM keywords in your subject line
-
Ask your subscribers to add your sender to contacts in the welcome email and/or to drag your emails from Promotions tab into primary, that will ensure future emails to into Inbox.
-
Segment and personalize your emails and address your subscribers by name in the email body. The emails need to be written more like 1:1 emails coming from a friend.
-
Improve engagement – clicks and CTOR to signal to Gmail that your emails are important. Try sending occasional emails that may produce a higher engagement rate – surveys, questions, valuable content.
The longer you have low engagement the harder it will be to get emails into Inbox in the future. If some of your contacts don’t engage for a long time consider sending a confirmation that they still want to get your emails or trim them from your list.
If your list size is small (under 5000 emails) you can send 1:1 emails to your subscribers offering them assistance, asking for feedback, or offering valuable service/content to try and boost your engagement rates. This tactic works well for Gmail.
14.Merge Tags
Merge Tags in Subject Line and Preview
You can use merge tags in your email template text or links and these fields – subject line, preview, From label, and custom reply-to label.
To add merge tags into fields outside email template (subject, preview, from or reply-to label) use *|FIELD_MERGE_TAG|* syntax and copy the merge tag for the field you want to use on your Fields page. You can find your fields page by clicking on the brand name in the header and selecting Fields from the menu.
Merge Tags in The Template Body
You can use template editor UI to insert a merge tag into your email template:
In Drag-n-Drop Editor (while on Text element) click on Merge Tags:

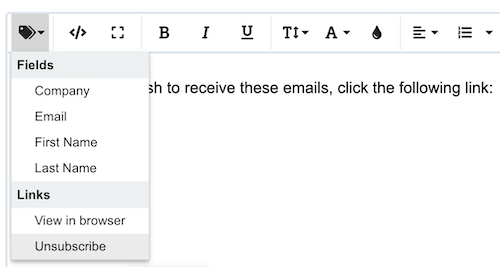
In Classic Editor – position your cursor to where you want to add the merge tag, then select the field you want to drop into template:
BigMailer supports basic conditional merge tags in both Classic and Drag-n-Drop editors:
- You can specify a fallback/default value.
- You can add IF/ELSE conditions.
- You can loop through a set of data, including multiple RSS items.
Default Value
Here is how you would specify default/fallback value:
*|DEFAULT:FIRST_NAME, 'Friend'|*
Using the if merge tag you can make the content of your campaigns conditional on the attributes of the contact. The ELSE section is optional.
*|IF:STATUS = 'paid'|*
  <p>Thank you for subscribing!</p>
*|ELSE:|*
  <p><a href="#">Subscribe now and receive 10% off</a></p>
*|END:IF|*
The if merge tag can also include 1 or more ELSEIF sections:
*|IF:STATUS = 'paid'|*
  <p>Thank you for subscribing!</p>
*|ELSEIF:STATUS = 'cancelled'|*
  <p><a href="#">We want you back! Get 20% off</a></p>
*|ELSE:|*
  <p><a href="#">Subscribe now and get 10% off</a></p>
*|END:IF|*
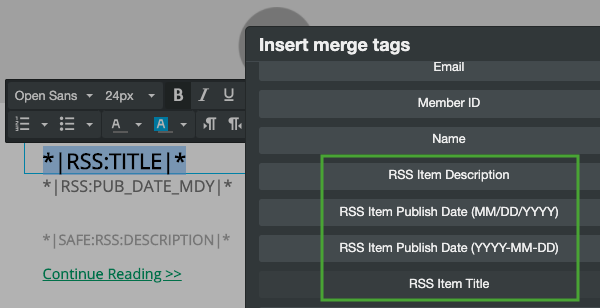
RSS Items
You can use RSSITEM:IMAGE or RSSITEM:IMAGE_URL merge tags to add an RSS item image into your template. The first will output a full HTML image tag for the item image, the second will just be the url. The first you will want to use with the SAFE / HTML filter so that the content is not escaped, example:
*|RSSITEMS:|*
*|SAFE:RSSITEM:IMAGE|*
*|END:RSSITEMS|*
*|SAFE:RSS:IMAGE|*
If you want to generate the IMG tag yourself and get the URL of the image:
*|RSSITEMS:|*
    *|RSSITEM:IMAGE_URL|*
*|END:RSSITEMS|*
Or just for the latest image URL:
*|RSS:IMAGE_URL|*
Please refer to this document for more examples.
15.How to create and manage landing pages
Landing page library of templates (with forms!) are coming Mar 22-24, 2023
FAQ: 1. What can you do with BigMailer landing pages?
- You can setup landing pages hosted either on a) BigMailer domain bigweb.site, or b) a custom site domain that you own.
- Host a landing page in the root of your domain.
- Use landing pages with or without email/data collection forms.
- See landing pages stats – visits, clicks, form conversions
- Upload and use images hosted on BigMailer or use images from your website.
- User forms to collect emails or other data.
- Run polls and surveys to collect more info on your subscribers.
FAQ: 2. How can I use landing pages on free plan?
You can host up to 3 landing pages for free, including a page in the root of your domain. You can host landing pages on BigMailer domain or your own.
How to Create a Landing Page
To create a landing page, go to Campaigns tab in the top navigation, then click Create and select Landing Pages campaign type.
You can start with a pre-built library template as a starting point or use our drag-n-drop editor to build your own page with a unique layout.
To create a new page or modify an existing template you need to first drag some row containers (singe or multi-column) into the template area, then drag the content blocks into the row containers.
How to Add a Form to a Landing Page
Before you add the form to a landing page, you need to define ALL the fields that would be used in the form, on your Fields page. Click on your brand name in the header and select Fields option from the menu.
Email is the only required field that is automatically created in BigMailer. All other fields you have to define yourself.
Once you add fields, they will appear in the list under the Form element type.
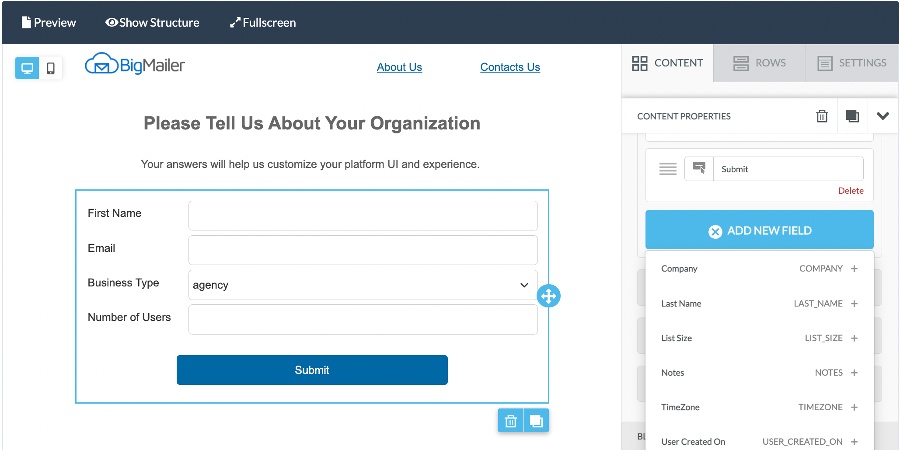
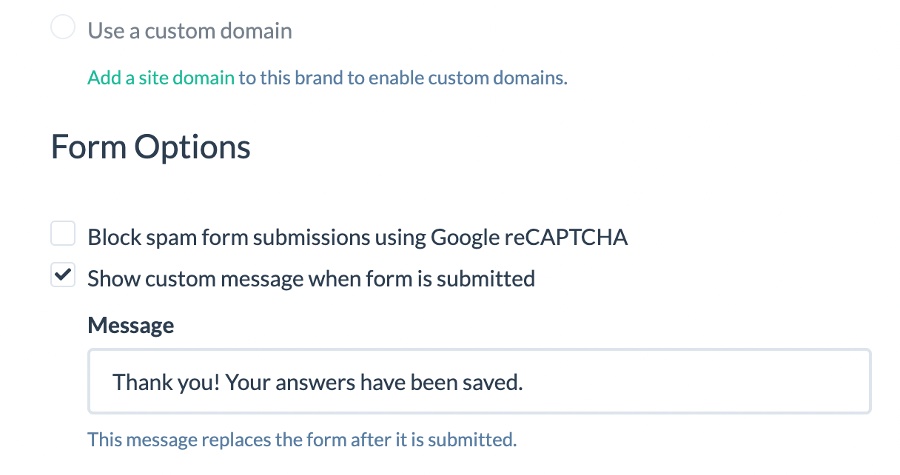
If you want to change the default confirmation message you can do that above the editor.
Landing Page Hosting Options
You can use BigMailer domain bigweb.site for hosting your pages and specify a slug. Or, If you own a domain you want to use for your landing pages, you can use that as well.
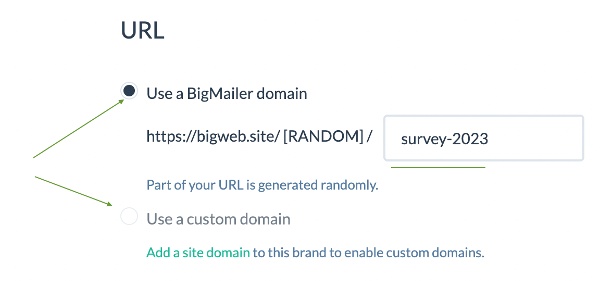
You will need to either create a CNAME for a new sub-domain that would be used for your website, or update your existing CNAME entry for www to point to BigMailer if you want to host BigMailer landing page as your website’s homepage.
To add a CNAME record you need to have access to your website’s DNS records, which are typically controlled by your domain’s registrar (e.g. GoDaddy, NameCheap, etc), unless you have a separate provider that manages DNS records.
16.Analytics and Reporting
Campaign Reporting
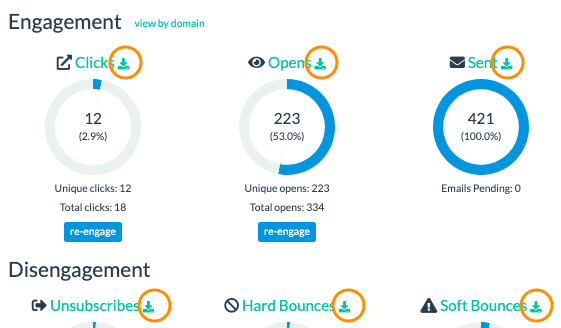
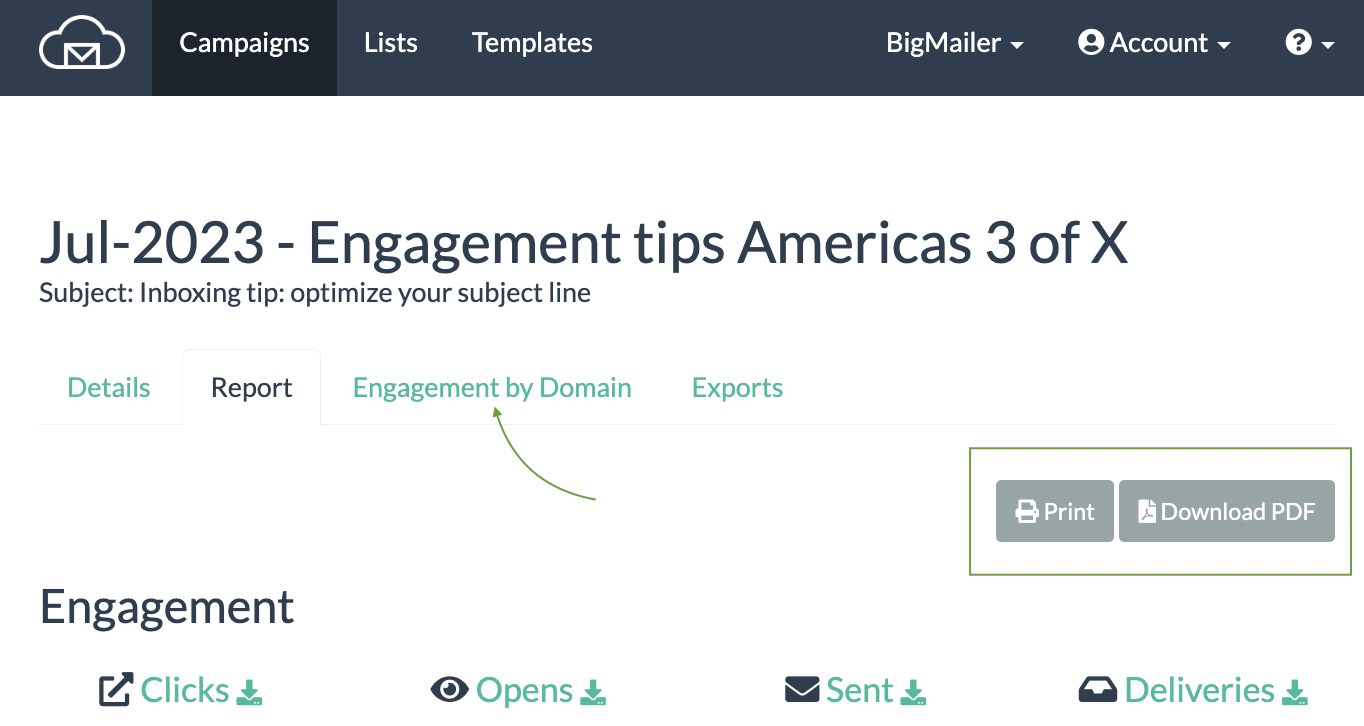
Below is a screenshot of the top of the Campaign Reporting screen – you can click on stat headers (Clicks, Opens) to view contacts list or click on the icon circled in orange to download the data as a CSV file. Below this section you can also see Top Links section and engagement graph that starts as 48 hours and changes to 30 days after 48 hours pass.
How Does BigMailer Track Campaign Opens?
BigMailer tracks opens and clicks on all campaigns by default, but there is an option to turn off tracking on each campaign.
We track opens on all html-based campaigns by embedding an invisible, 1-pixel image in your campaign. When a contact opens your email and chooses to display the images in your email, that graphic is downloaded from our server and it is recorded as an open.
If a contact chooses not to display images, their open may still be tracked if they click on a link contained in your campaign. Link tracking will need to be enabled for this option.
It is not possible to track opens for plain text emails.
Sometimes you may see initial opens come in very quickly after campaign is sent. That happens because some email clients pre-fetch emails and some programs scan emails (images and links) for security reasons and both produce open events.
Campaign Engagement Reporting by Domain
You can check campaign engagement by mailbox provider to help you understand and optimize your engagement. This helps you understand your engagement beyond averages and help spot and prevent issues with specific providers.
For example, you may discover that some providers have a much higher soft bounce rate (icloud.com, me.com due to shared storage with music) or high complaint rate (comcast.net) and may want to filter those out from early campaigns as you warmup you sender volumes and establish your sender reputation.
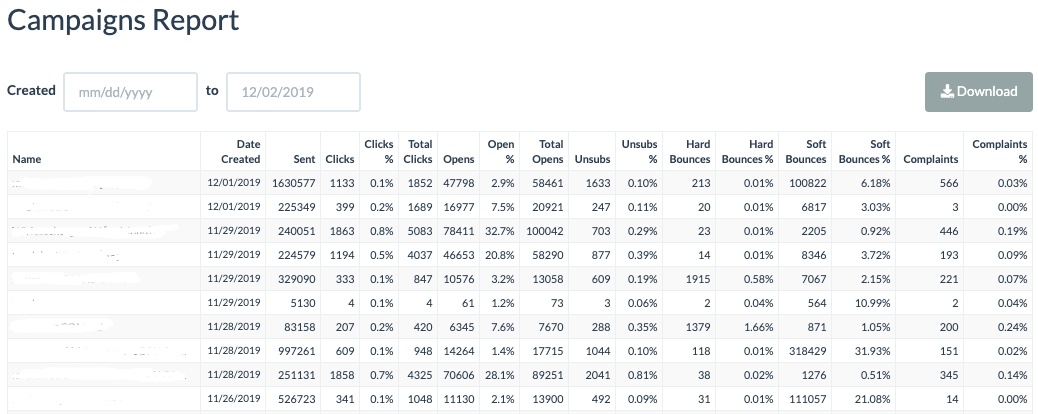
Report Across Campaigns
To see all campaign stats and to download a report for all bulk campaigns go to the Campaigns tab in the header, then look for “Report” button on top right:

Once on reporting page you can set date range and download a CSV file of the campaign engagement data.
Bounces, Unsubscribes, and Complaint Reporting
BigMailer automatically handles bounces, unsubscribes, and complaints. Those contacts are not deleted from your Lists, but rather tagged with status for appropriate action. When a contact hard bounces or complaints, they are not sent emails again. An unsubscribe stops receiving future emails unless they are deleted and then re-added to the list so keep this in mind when re-importing Lists with duplicate contacts. Best to not delete those records.
By default, BigMailer treats a contact as undeliverable after it soft bounces 5 times, but you control this setting on your Brand settings page. The most common reason for a soft bounce is an inbox full (others are rejections for attachments too large or provider service down), so consider your email frequency when changing this setting. The soft-bounces tend to go up during major internet outages (like the Gmail outage in 2021) or during popular vacation times like the week between Christmas and New Year.
You can export your hard bounces and complaints using segmentation, then download the exported CSV file and use it to delete those contacts in bulk by going to “Bulk Actions” button on the Lists page and selecting “Bulk Delete” from the menu. This action reduces your contacts total for billing purposes and good to do once every 6-12 months.
You can setup a custom webhook on your API page to receive events data from BigMailer – unsubscribes, complaints, and bounces. See documentation for more info on webhook setup.
Newsletter Archives
You have the option to enable an archive page, for listing you bulk (only) campaigns that don’t have archived status. Here is how to enable the archive page:
- Go to your Brand name link in the header and expand the menu
- Click on “Add-ons”
- Click on “Enable” button next to “Public Campaign Archive Page”
Once enabled, you will see your archive page link on any campaign report page.
Quick Tips:
1. When you use links to past emails from the archive page they will not contribute to your campaign engagement stats (unlike the one you would grab from View Browser link).
2. Consider linking to the archive page on your email signup module to show your subscribers what they get.
17.Billing, Subscription Management, and Cancellations
1) Delete contacts under your Lists (click on arrow down icon next to List name and select “Delete”) or delete a segment of your list. Once your contacts are removed you can:
2) Change the slider to a new level or downgrade your plan back to Startup (free) plan on the Billing page.
Note: You can not delete any contacts that were sent an email in the last 21 days, to ensure unsubscribe page works for them.
To upgrade your account go to your Billing page and use the slider to change the total number of contacts you need to store.
Please use the live chat icon in the app to reach us if you have any questions or need assistance with anything.
18.SES and BigMailer Account Suspensions
BigMailer automatically and manually reviews content of emails and may suspend an account if we identify suspicious content or links. In cases of automatic suspensions we review accounts within 24 hours and notify customers only if an account has been re-activated or was suspended in error. If your account was suspended in error and you need to expedite a review you can reach us on live chat.
Amazon SES Account Suspension
If your Amazon SES account gets suspended, it’s likely for the following reasons:
- High bounce rate – above 10%. To prevent this from happening you should always validate your list prior to sending bulk campaigns, if you haven’t engaged it in more than 1 month. A typical list decay rates are 2% per month for B2C lists and 3% per month for B2B lists.
- High complaint rate – above 0.1%. On small volume campaigns, this number can be higher since there is no statistical significance, but this ratio is very sensitive on high volume campaigns.
- Sudden change in sending volume. This may signal that your email list isn’t growing organically and perhaps a list was purchased or harvested in some aggressive way. Always increase your daily sending volume gradually.
- A combination of the following: close to high bounce and complaint rates that triggered a manual review for your account and your messaging (email content) was determined to be confusing in regards to the sender of the message. For example, your links, logo, and messaging in the email don’t match the sender identity used. This is a common challenge for businesses or consultants that work with 3rd party services (e.g. mortgage and insurance quotes).
- Low engagement (opens and clicks) rate for a long period of time on high volume. Open rates below 2%.
To get your account out of suspension we recommend you write a message to Amazon explaining what issue you have identified and what measures you put in place to prevent the issue going forward (see list above) and request account reinstatement. You can refer to this FAQ article about suspensions and steps to take to resolve. Please note that Amazon isn’t likely to provide you with the reasons for account suspension, so you may need to troubleshoot your recent activity using the list above in order to identify the issue and find a way to mitigate. Here are some examples of possible issues you may need to resolve:
- Validate your list to lower a bounce rate (a healthy bounce rate is below 5%).
- Lower your complaint rate by making your Unsubscribe message more clear and link easy to locate.
- Eliminate confusion about why someone is getting a message from you or your relationship to the brand you are communicating on about or on behalf of (e.g. adding a brand logo into the email template or explain why a user is getting a communication from you in the footer where Unsubscribe link is).
If you need assistance with this please reach out to us via chat.